Anatomy and Character Sculpture - Final Project: Polishing and Dynamic Posture with Props
12/7/2024 - 26/7/2024
Week 12 - Week 14
Ng Jia Ern 0363033
Anatomy and Character Sculpture
Final Project: Polishing and Dynamic Posture with Props
INSTRUCTION
TASK
You are to finally polish your character, Cleanup and retouch your sculpt
accordingly with an appealing posture that represents character
personality clearly. Character to have props that will further support
characters persona and adds visual narrative of its nature. Sculpture
should stand on a platform and retopoed. Lighting to be further enhanced
and final renders to then be retouched in photoshop or ad digital painting
tool. Below are the required breakdowns list:
- Collective shots rendered to show components in details
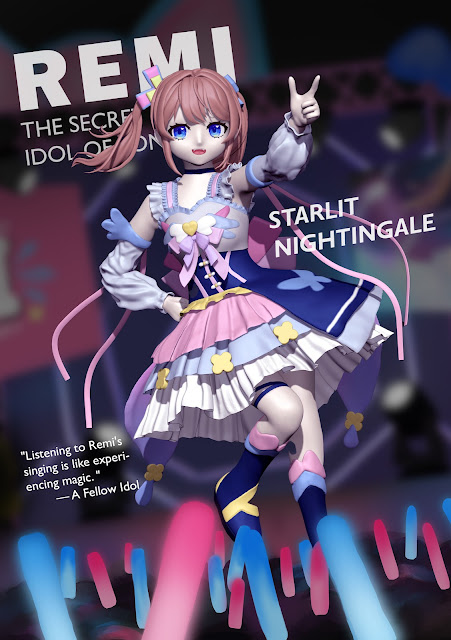
- Final render to be polished and presented on a potrait sized image. Printable high res.
- Final poster with appealing layout.
- Baked texture sheet
- Projection to low-poly model
- Character turntable
SUBMISSION
Final Project Compilation:
Final Presentation:
Final Turntable:
Final Render:
Final Poster:
FEEDBACK
Week 11:
Week 13:
REFLECTION
Initial Challenges
-
Software Familiarity:
- When I first started with the ZBrush module, the experience was quite overwhelming due to my lack of familiarity with the software. The interface is extensive, and many of the functions were not intuitive to me initially. I often found myself lost, not knowing where to find the tools or settings I needed, which made the process frustrating and time-consuming.
-
UI Navigation:
- A significant hurdle was navigating through the various menus and finding the specific tools I needed. I quickly realized that the default interface was not efficient for my workflow. The constant back-and-forth between menus slowed me down considerably.
Solutions and Tips
-
Custom UI Layout:
- To address the navigation issue, I took the time to customize my UI. I rearranged the interface by dragging out the tools and functions I frequently used, placing them in a dedicated panel. This customization allowed me to have quick access to essential tools without the need to open multiple menus. This simple adjustment significantly improved my efficiency, reducing the time spent searching for tools and allowing me to focus more on the creative aspects of modeling.
Custom UI I arranged myself
-
Hair Modeling Approach:
-
Initial Attempts:
- When I first approached hair modeling, I used the ClayBuildup brush directly on the head of the model. This method quickly proved challenging because it was difficult to control the flow and shape of the hair strands. The results were inconsistent, and I struggled to achieve the level of detail I wanted.
- Improved Method:
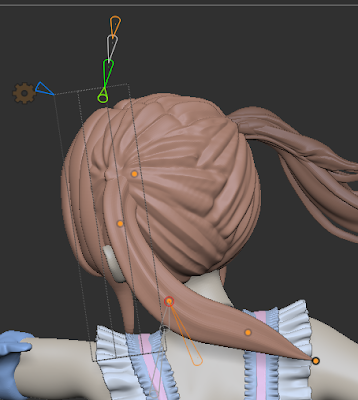
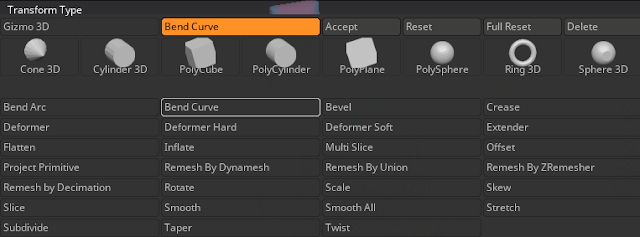
- After some experimentation, I shifted to using the Bend Curve tool. This tool allowed me to create and manipulate individual hair strands with much greater precision. By adjusting each point along the curve, I could control the position and shape of the hair strands, resulting in a more polished look. However, this method was quite slow since each strand had to be adjusted individually.
- Optimized Process:
- To improve speed while maintaining control, I found that combining the Curve Tube brush with the Bend Curve tool was highly effective. I first used the Bend Curve tool to establish the general shape of the hair, then switched to the Curve Tube brush to add finer details. With the Curve Tube brush, I could draw smaller hair segments that snapped to the surface of the existing model, making the process faster. To refine these segments further, I used the ZModeler tool to select edge loops and applied polishing to create smooth transitions. This combined approach allowed me to efficiently model hair with both detail and accuracy.

2. Mesh Management Techniques:
-
ZRemesher:
- One of the crucial tools I used was ZRemesher. Before starting detailed sculpting on a new shape, I would run it through ZRemesher. This tool automatically reorganizes the mesh, creating a cleaner topology that is easier to work with. This step was particularly useful when I needed to increase the polygon count on a new part of the model.
-
Dynamesh:
- Dynamesh was another essential tool for managing the mesh. It allows for seamless integration of different parts of the model by merging them into a single, unified mesh. The resolution of Dynamesh can be adjusted to control the overall polygon count. However, I learned to be cautious when using Dynamesh with very thin models, as it can cause the mesh to break. To prevent this, I would sometimes thicken the model or adjust settings in the Geometry Preferences, specifically reducing the Close Holes slider to 0 if I didn’t want to seal any open areas.
-
Subdivision Levels:
-
Subdivision was occasionally necessary when my model appeared
pixelated or lacked detail. By pressing
Ctrl + D, I could add a subdivision level, effectively increasing the mesh's resolution. However, I found this method less convenient than others, as managing multiple subdivision levels can become complicated.
-
Subdivision was occasionally necessary when my model appeared
pixelated or lacked detail. By pressing
-
Dynamic Subdivision:
- Dynamic Subdivision was particularly useful when I needed to add thickness to thin parts of the model. After applying the thickness, it was important to remember to turn off the feature to avoid performance issues, as keeping it on could cause the software to lag or even crash.
Reflection on Character Design
-
Design Challenges:
- One of the biggest challenges I faced was the slow progress in character design. This was largely due to my tendency towards indecision and overthinking. I often found myself questioning the quality of my designs, which led to significant delays in finalizing the character's appearance. This indecision not only slowed down my design process but also affected other aspects of the project, such as anatomy modeling.
- Initially, I started modeling based on a typical female body type. However, as the design evolved, I decided to change the character to have a shorter and smaller body frame. This change meant that I had to go back and adjust the existing model to fit the new proportions, which was time-consuming. If I had finalized the design earlier, I could have avoided this extra work and maintained a smoother workflow.
Tool and Brush Recommendations
-
SK Pack Brushes:
-
During the modeling process, I discovered the SK Pack of brushes,
which significantly enhanced my workflow. These brushes provided
specialized tools for different sculpting tasks:
- ClayFill Brush: This brush was particularly effective for filling in depressions or holes in the model. Unlike the Smooth tool, which tends to flatten both raised and recessed areas, the ClayFill brush allowed me to target and fill only the depressions, preserving the surrounding details.
- Clean Clay BuildUp Brush: The standard ClayBuildup brush often left the surface rough and uneven, with noticeable lumps. The Clean Clay BuildUp brush, however, offered a smoother finish, making it an advanced version of the standard brush and ideal for more refined sculpting.
-
SK Cloth Brush: When it came to sculpting fabric,
the SK Cloth brush proved invaluable. It made it easier to create
realistic folds and creases in clothing, adding a level of detail
that would have been difficult to achieve with standard
brushes.
-
During the modeling process, I discovered the SK Pack of brushes,
which significantly enhanced my workflow. These brushes provided
specialized tools for different sculpting tasks:
Brush that I use frequently:
Technical Insights
-
Layer Merging:
- Another important lesson was the handling of layers during the modeling process. I learned that even after merging layers, they could still be split into separate groups. This flexibility was helpful when I needed to make adjustments after merging. However, if I accidentally deleted a layer, recovering it was only possible through quick saves or by reverting to an earlier saved version of the project. This experience taught me the importance of saving frequently and using layers wisely.
-
Crash Prevention Tips:
-
ZBrush is prone to crashing under certain conditions, so I adopted
several precautions to minimize the risk:
- During auto-save, I made sure not to interact with the software at all. Even a minor action during this process could trigger a crash.
- I always saved my work before running ZRemesher on a high-poly model, as this tool can be particularly taxing on the system.
- Before using Dynamesh, I saved my work as well, since this process can sometimes result in unexpected issues.
- When moving between different subdivision levels, especially from low to high, I took care to avoid abrupt changes that could overwhelm the system.
-
ZBrush is prone to crashing under certain conditions, so I adopted
several precautions to minimize the risk:
-
Useful Tools:
-
Polish Deformation:
- I found that the Polish tool under the Deformation menu was extremely helpful. It allowed me to smooth out the surface of my model quickly without having to manually use the Smooth brush, which saved a lot of time during the refinement stage.
-
Poly Painting Resolution:
- I learned that the resolution of poly painting is directly related to the polygon count of the model. Increasing the polygon count before painting resulted in finer, more detailed colors, making the final output look much better.
-
Polish Deformation:
Areas for Improvement
-
Understanding 3D Proportions:
- One of the persistent challenges I faced was mastering 3D proportions. While I am comfortable with 2D design, translating those designs into 3D space was much more difficult. This issue became especially apparent when the model was posed in dynamic ways. The change in perspective and the relationship between different parts of the model were hard to grasp, leading to inaccuracies in the proportions. Improving my ability to visualize and maintain correct proportions in 3D will be crucial in future projects.
Future Goals
-
Rendering Skills:
- Moving forward, I want to learn more about rendering techniques. The built-in ZBrush renderer is challenging to use and often doesn’t produce the quality of results I’m aiming for. By improving my rendering skills, I hope to produce more polished and professional-looking final images.
-
Preparation for 3D Printing:
- Another area I want to explore is preparing models for 3D printing. This includes learning how to properly segment the model, optimize the geometry, and export files in a way that ensures successful printing. Understanding the nuances of this process will allow me to bring my digital creations into the physical world.
-
Learning from Others:
- To continue improving my skills, I plan to watch more modeling videos and tutorials. Seeing how other artists approach different challenges will provide me with new techniques and ideas to enhance my own workflow. This ongoing learning will be key to increasing my efficiency and proficiency in ZBrush.


Comments
Post a Comment